
Jacky features a native integration with Home Assistant to control IoT devices in your home using natural language voice or text commands.
Home Assistant credentials are saved locally on your device (stored encrypted-at-rest via the OS keyring like Windows Credential Manager or macOS Keychain). Your keys are never sent to any external server.
How it Works
When you trigger a command like "enciende la luz de la oficina" (or "turn on the office light"):
- Intention Match: The routine engine matches the keyword trigger and starts the Home Assistant routine.
- Entity Resolution: Jacky uses fuzzy token matching or LLM fallback to resolve the query to a specific device entity (e.g.,
light.office_main) from a locally cached list. - Service Dispatch: Jacky sends a REST API request directly to your Home Assistant instance to execute the action (e.g., calling the
light.turn_onservice). - IoT Control: Home Assistant processes the command and updates the physical device (e.g., sending the command to your smart bulb).
Setting Up Home Assistant
- Prepare Home Assistant:
-
Set up Home Assistant on another device (e.g., Raspberry Pi) or in a local Docker container.
Example command to run Home Assistant in Docker:
docker run -d \ --name homeassistant \ --privileged \ --restart=unless-stopped \ -e TZ=America/Mexico_City \ -v C:\ha-config:/config \ -p 8123:8123 \ --network=host \ ghcr.io/home-assistant/home-assistant:stable -
Integrate your devices. For Smart Life/Tuya devices, synchronize them using the Tuya integration in Home Assistant so they show up as entities.
-
- Generate Access Token:
- Go to your Home Assistant profile page, scroll down to Long-Lived Access Tokens, and click Create Token. Copy it immediately.
- Configure Jacky:
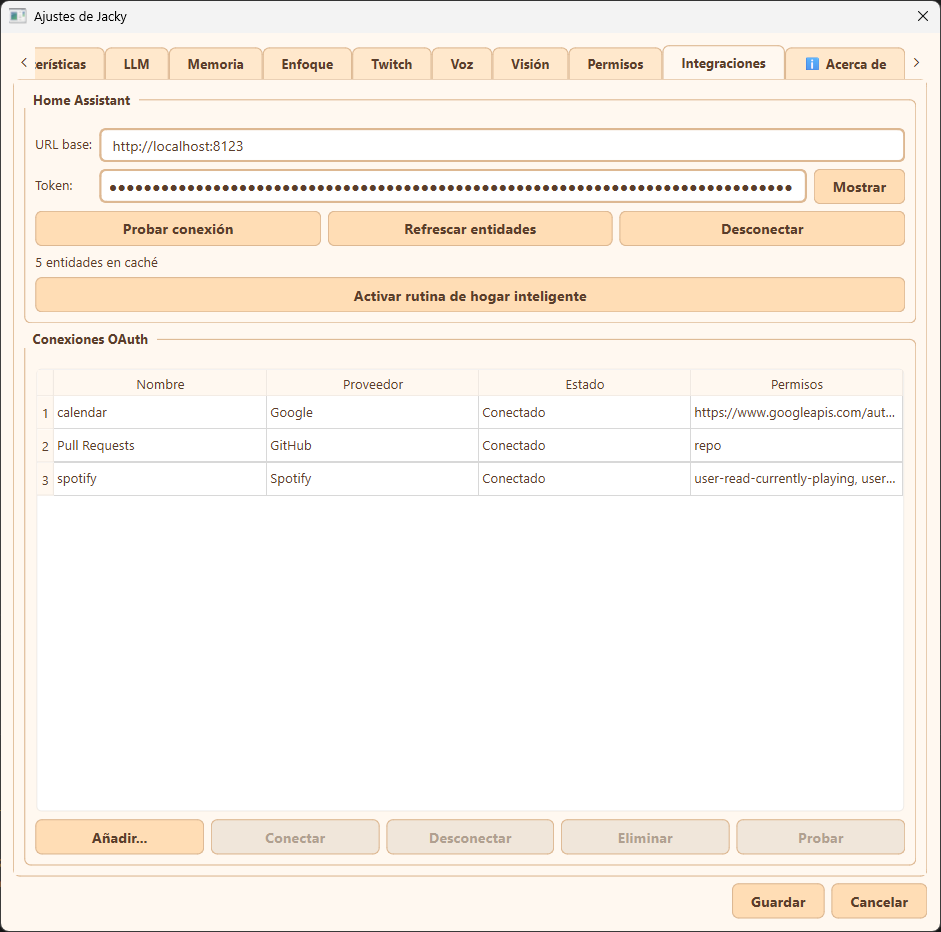
- Open Jacky's Settings -> Integrations tab.
- Enter your Base URL (e.g.,
http://localhost:8123or your local LAN IP). - Paste the Long-Lived Access Token.
- Test & Cache:
- Click Probar conexión (Test connection) to verify authentication.
- Click Refrescar entidades (Refresh entities) to build the local device cache.
- Click Activar rutina de hogar inteligente (Activate smart-home routine) to enable the default trigger keywords.
Permission Required: For security and privacy, you must explicitly enable the Control smart home (allow_smart_home) permission in the Permissions settings tab. Without this permission, smart home routine steps will fail.
Next Step: Create a Routine
Simply configuring Home Assistant only connects Jacky to your smart home. To allow your pet to actually control devices and respond to events, you must create a routine with a smart home step.
Configure Smart Home Routines